It has been a decades old tradition in my family to do soccer prediction games whenever there is a World Cup or a Euro Championship. Every two years, we’d get another game going, try to predict scores for all games, and get points for it.

It wasn’t until the World Cup in 2018, if I remember correctly, that I got curious about using statistics and math to help with predictions. That was when I found Nate Silver’s statistical analysis site at fivethirtyeight. Alongside political statistics, he was having parts of the site dedicated to various sports. This included national and club soccer team predictions. For the 2018 world cup, I used his publicly available goal projections and Monte Carlo simulations to inform my predictions in my family’s game. I took 538’s projected goals and built my own spreadsheet that would run them through a Poisson distribution table to give me probabilities for each result as well as tell me how many expected points I would get in the prediction game - and I won the prediction game as a result. In that year, I learned a lot about approaches to goal projections.
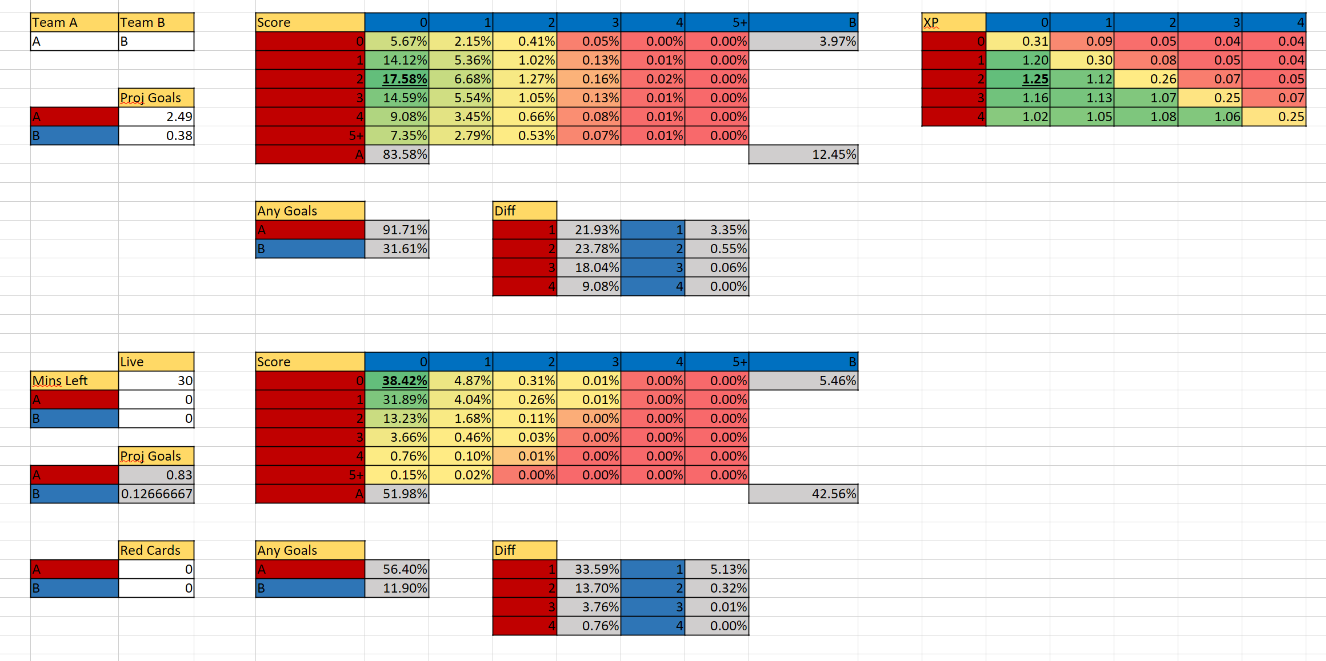
Poisson Spreadsheet

Later, by 2023, fivethirtyeight was taken over by ABC and their sports analysis was completely shut down. Nate Silver had left the company and, as I write this now in 2026, fivethirtyeight is completely dead, not even doing political analysis anymore. When the next tournament came around, I was thus lacking reliable goal projections to use as a base. It quickly became clear to me that I need to go beyond just doing a Poisson sheet and cover the entire process of the prediction myself.

I remember looking around at other sources for inspiration and predictions, but nevertheless I started looking into building my own thing. As a Ruby script, I created my very first prediction model. Using the database of all games in national soccer history from the amazing GitHub repo over at martj42/international_results, I got my first attempt at projecting goals going, calculating projected goals and plugging them into my existing spreadsheet. A lot of tuning and tweaking a what was (and still is) a relatively simple amateur model went into it. It wasn’t perfect but it gave me results that looked acceptable. And more importantly, instead of using Nate Silver’s professional predictions, I was now using calculations that were all entirely my own. If they ended up being good or bad, if I won or lost the prediction game, it was all on me. That kinda felt good and fun.

Fast forward into this year with the World Cup 2026, I stopped using Microsoft Office and Excel (which my spreadsheet was made for). Converting to LibreOffice was not a big issue but I found the process of running my external script and importing the data for predictions to be convoluted and not very handy. Especially if I want to access my prediction data remotely. It was time for the next step. It was time to turn this all into a proper app.

And thus, being a thorough enjoyer of the Svelte framework, I decided to rewrite the entire thing into a web app.

I am happy to share my national team prediction site at https://www.mystler.eu/xg/.
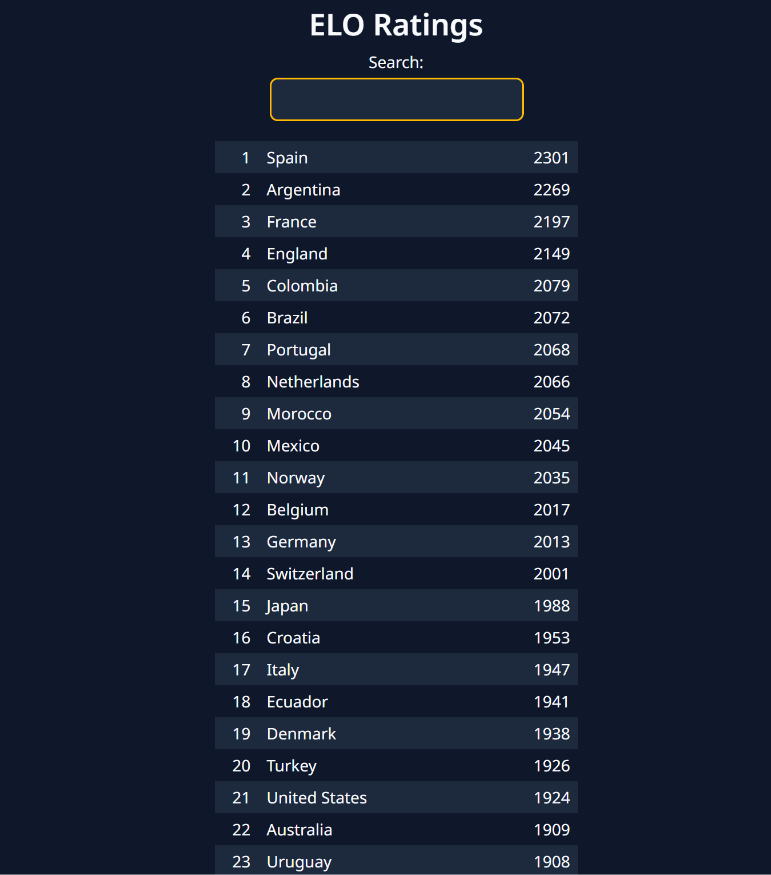
Mystler's ELO Ratings

Let me go into some more detail on what exactly this does.

First of all, my tool automatically fetches the latest results from martj42’s result database. It calculates an ELO Rating for each team. The calculations for the ELO Ratings are based on the general ELO math as explained on its Wikipedia page as well as weight factors as used by eloratings.net, a rating site that is often seen as better than the official FIFA World Rankings. Of course, the current ratings can always be looked up on my site.

When a user now enters two teams to compete against each other, my site begins its prediction math. This process was inspired by xgscore.io. Originally, I was just using weighted averages of all historical games in a certain time frame to get scored and conceded goals for each team. But for this rewrite, I decided to follow xgscore’s example and improve the process by looking at categories of games. My tool will collect the last few results in Head to Head games, Most Recent games, and games against similarly strong opponents as the intended opponent based on their ELO rating. The weights for all of these come with defaults (and recency weights) that I found lead to decent results but they can all be manually tweaked on the site. Then, they are combined into a final average of goals scored and conceded for each team. Based on the ELO win probability for each team (e.g. a 60%/40% team weight) they are again combined into the final projected goals for the game.

With the projected goals calculated, these are passed into a Poisson table. Similar to my spreadsheet, this table shows expected probabilities for various results and calculates expected points (XP) in a prediction game. The projected goals (if you want to compare with another source), the prediction game points, or even live approximations with only a certain amount of time left, or the possibility include extra time, can be adjusted by the user.

Fun bonus fact: Based on Nate Silver’s old blog posts, I remember him calculating that every red card usually translate into a +0.55 and -0.55 expected goals over 90 minutes for each team respectively. That is why my tool supports red cards too. It is a gimmick and I do not know if there is more recent data but I like having it around as a stat that goes way back to my original first spreadsheet in 2018.
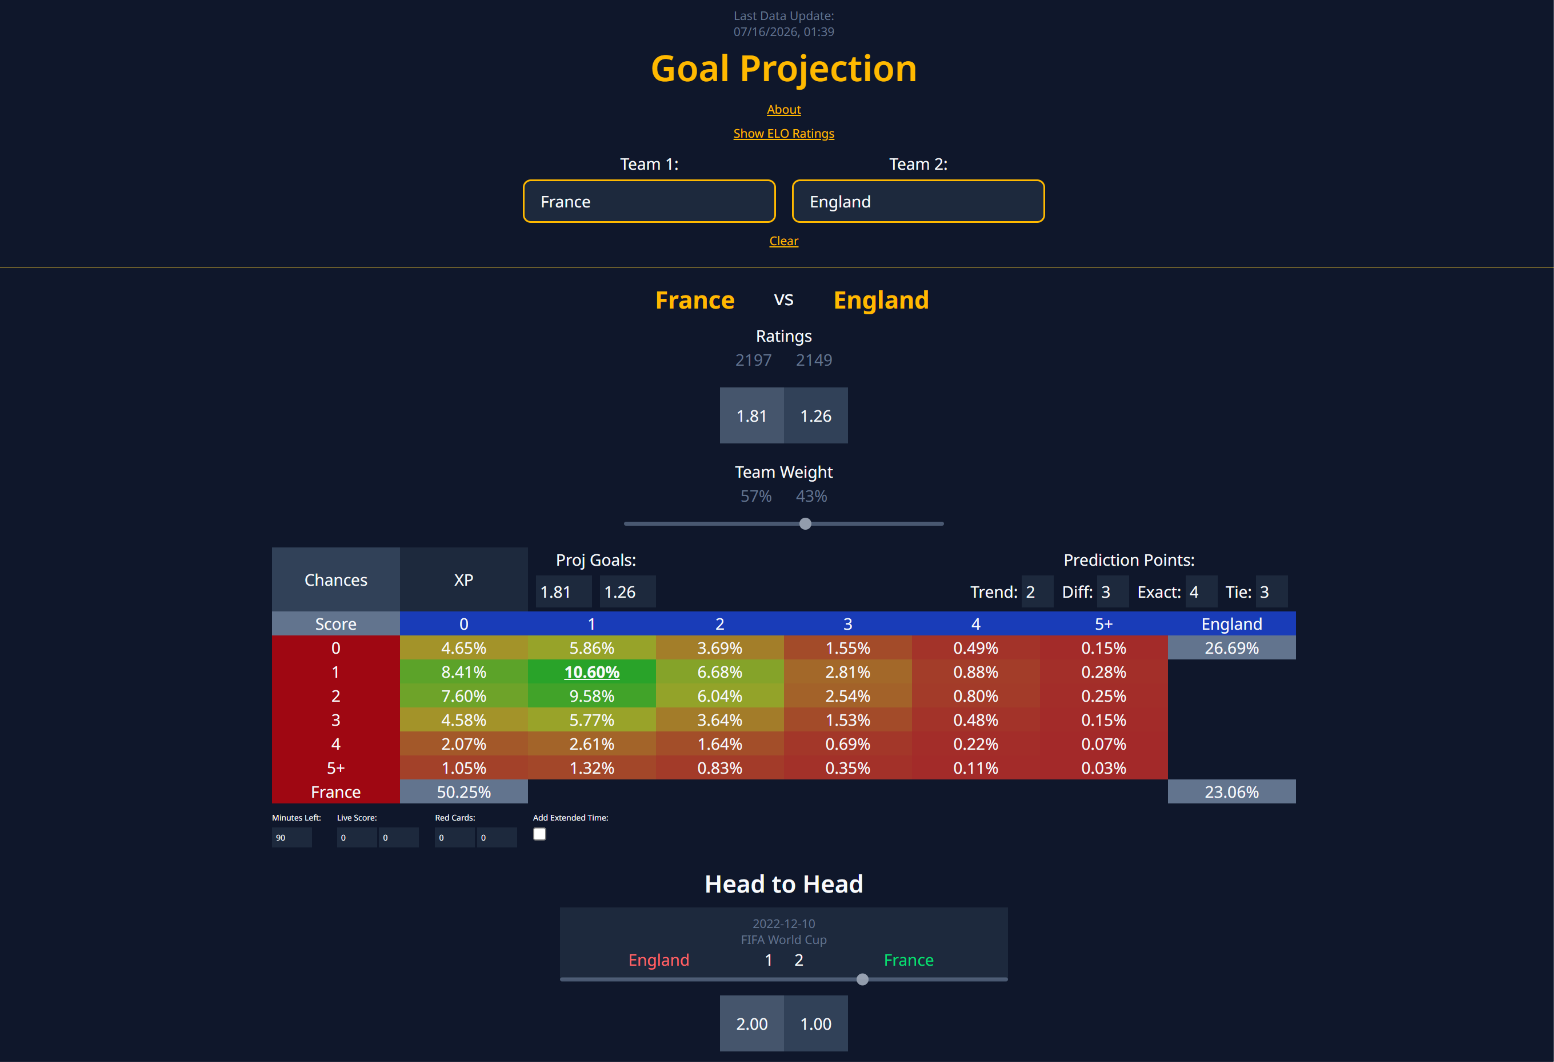
Example Prediction for France vs England

As I write this, the World Cup has two games still left to be played but I have already cleanly won the prediction game, with all of the semi-finalists and finalists that I predicted before the tournament having come true. Of course, my prediction tools are just a naive model that is far from perfect. But it does seem to yield reasonable results and while statistics cannot know how any specific game is going to end, the regression to the mean is a thing. Upsets are fun and exciting but in the end the stronger teams tend to prevail. I am happy I tackled this project this year and turned my spreadsheet into a website I can access from anywhere (even install it as a PWA on my phone) and get some predictions.

If you are curious, feel free to check it out and play with it yourself. I intend to keep this running and tweak it as necessary for future tournaments.
May 4, 2026

I have an old netbook. Its hardware is old and slow. I also have no practical reason to use it when other devices like my PC or even my phone are better for pretty much anything I might want to do with it…

However, this old netbook has accompanied me throughout my entire time at university and I have grown emotionally attached to it. On top of that, there is something else I love to do every now and then: Fiddling with Linux distrubutions and customizing them.

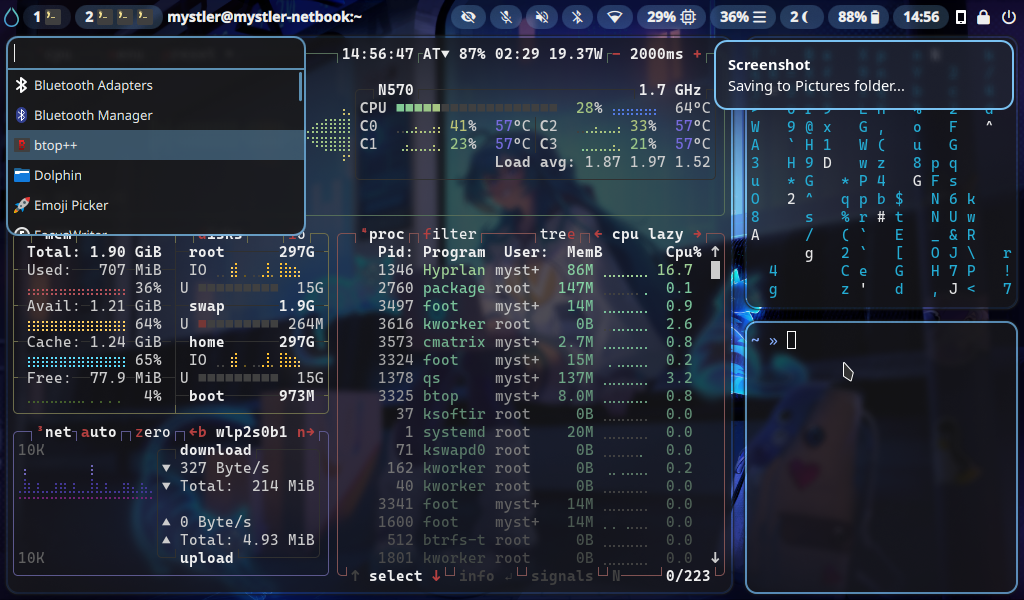
And this is how we get to today’s topic: I’ve spent some time over the last weeks to keep the old netbook up to date and customize it (aka. “rice it”, in the Linux nerd jargon) by making my own desktop.

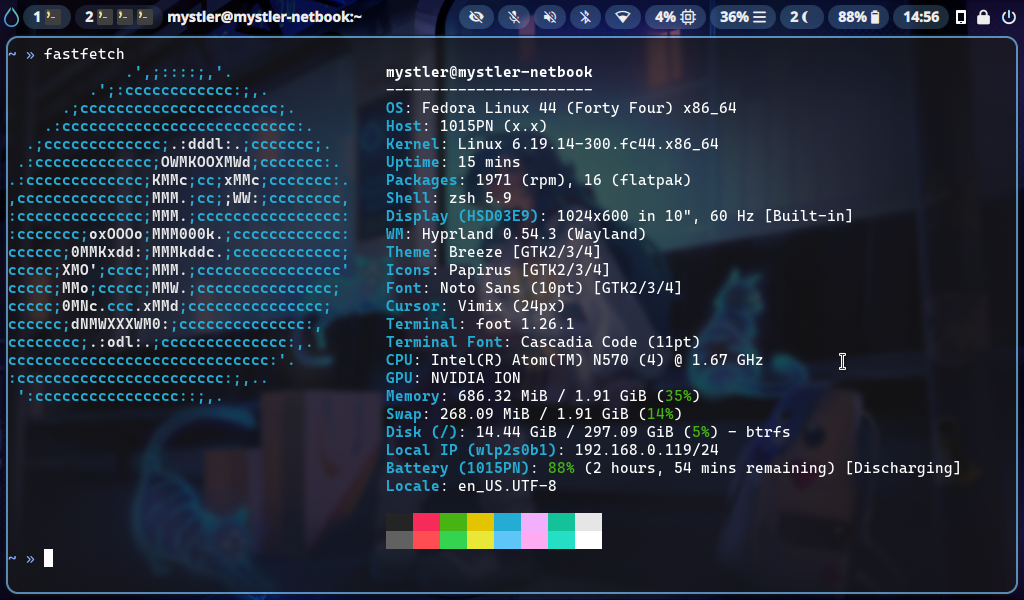
The Desktop of my netbook using Hyprland


This is not the first time I’ve done customizations but it is probably the time I went the furthest and felt like it might actually be interesting to share some insight into what I did.

For the past two years or so, I had been running a Fedora installation on it, using the Fedora Everything minimal net installer with KDE for the desktop. I generally like KDE a lot but it was also a fact that full-fledged desktop environments are causing heavy slowdowns on the netbook. Just idling after login was already consuming 1.3GB of the available 2GB of RAM. Starting anything, even just system settings was slow.

Then, recently, I had the sudden urge to try going much simpler, by abandoning DEs altogether and using a window manager. At first, I tried Sway but I did not like it all that much and ran into some issues. Idle usage was so much lower though that I immediately realized that I was on the right track. Next, I installed Hyprland. I have seen it before using Sway, but since it was advertising itself with fancy effects and animations, I was worried it would mean it has higher consumption and runs slower. I was wrong. It worked better than Sway for the same usage. Configuring Hyprland was straightforward and fun with immediately visible results. Hooray!

At this point, I may need to clarify some things for readers that are not familiar with the nature of a window manager. The differences between a WM and a desktop environment like KDE are that, while KDE comes with everything you know from a classic desktop, like a taskbar, app launcher, apps to change settings, font and theme customization, and more, a window manager purely does what it says on the can: manage windows. Hyprland provides a base layer that handles how new windows are opened and displayed. On top of that window managers are usually tiling. While a typical Windows or KDE desktop have floating windows that you drag around anywhere on a screen, a tiling window manager automatically sizes and aligns new windows in a grid. It is designed for power users that want to effectively manage their screen space with automation and use multiple workspaces in parallel. The first reaction of most people hearing about this for the first time is likely: “Ehh, that sounds strange and tedious.” Tiling window managers are a case of, you need to try it out for yourself to realize where its strengths are compared to floating windows. That being said, Hyprland also supports things like floating, pinned, and fullscreen windows, of course. It is just the basic paradigm that is different.

With Hyprland running as the underlying window manager and providing visuals and controls for and arranging applications, the question was now how to build an “actual desktop” and add features that the window manager does not offer. One key part that I wanted is a status and taskbar. At first, I went with Waybar for a while. Waybar is great in how simple it is to set up. With just two config files, one to specify what modules you want and what information you want them to show, and one stylesheet to customize the looks, it served my needs well.

Later on, I found out about Quickshell though. Quickshell is much harder to set up and requires programming in QML to use, but it allows for even more customization. With Quickshell, you get a QML framework using Qt Quick with which you can develop your own desktop shell to whatever extend you desire. Thus, I set out to build a lot of my desktop shell all with Quickshell. I created my own taskbar with several status indicators and buttons, custom tray menu styles, a logout/shutdown screen, and a custom application launcher.

Things like consistent fonts and consistent coloring are pretty important to me and this approach allowed me to get something I find both functional as well as visually pleasing. After spending some time on that and building things as far as I wanted to have them on my netbook, I am now in a spot that I am pretty happy with. And during idle time, this setup consumes barely above half of the memory that KDE did.

Desktop with tiled windows and notifactions


For everyone with a more technical interest, here is a summary of the stack involved in my desktop at the time of writing:

  • Hyprland: Window Manager (also using additional packages like Hyprpaper, Hyprlock, and Hypridle)
  • Quickshell: Handwritten taskbar with status indicators, tray menus, app launcher, and logout screen.
  • Mako: Basic notifications daemon
  • Snappy Switcher: Alt+Tab workspace switching
  • Zsh + Oh My Zsh: Shell
  • Foot: Terminal client

Special note on Mako and Snappy Switcher: Indeed, I could also do notifications and an alt+tab display all with Quickshell. I just decided against re-inventing the wheel for these two when they already serve my needs fine at no noteworthy resource cost.

Special note on Foot: There are many, many Terminal clients out there. I probably would have used Alacritty or Kitty, but those are all GPU-accelerated and turned out to be a lot slower on my old netbook than a CPU client. Foot turned out to be blazing fast and a perfect fit.

Another side effect of working on this environment is that I have adopted Neovim (with LazyVim) as a primary editor, even using it through WSL on my Windows PC now.

My dotfiles for my configuration are available on GitHub.


I hope this post could give some glimpse into the world of Linux ricing. I encountered some fun tools on the way that, maybe, you are inspired to check out yourself. The ability to make your system whatever you want is one of they key strength of Linux environments, in my opinion. If this sounds intriguing to you and you are inspired to experiment with these things on your own, then I wish you a pleasant journey.

This is a nerdy video game post. Or, to be more precise, I already made a nerdy video game post elsewhere but thought I should probably share it here too.

After almost 10 years, the Powerplay game mode in Elite Dangerous is about to be reworked and started as 2.0 with new rules and gameplay very soon. Since I have been involved in coordination of part of the community as well as spreadsheets and tools development behind the scenes, I felt it important to compile and share some statistics as the first version of this game mode comes to an end and people transition over to a new era.

The target audience for this is mainly people that are involved in the Elite Dangerous community. However, anyone is free to check out my massive post that goes through a variety of statistics with some explanations and commentary.

Click Here

September 13, 2024

Heya! It is time for a new blog post because everything is now new and fancy.

Okay, okay, the general structure of my website is the same and all old blogposts are still available unchanged too. Nevertheless, I took some time to rewrite the entire thing. Instead of using Jekyll and Twitter bootstrap for the static site generation, I have set up a codebase using Svelte and Tailwind CSS with TypeScript. Is it overkill to do a simple static website with all of these frameworks? Probably! But it was a whole lot of fun too and Svelte has impressed me a lot. And on top of that, it allowed me to implement some new toys alongside updating my page content.

What new toys? While you’re invited to browse the pages on the new website, I can share a few songs that I have added to the Music page since my last post. And to do that I can use some new features I wrote for this site! You can click on the song cards below and listen to them while you continue browsing around! Neat, huh?

Inches of Mercury is a new project I started, which represents a fictional metal band in the Elite Dangerous universe. The name is based on an inside joke with a friend. We were talking about air pressure and noticed that the US use inches of mercury as the unit for that. I made the comment that it sounds more like a metal band than a unit for atmospheric pressure, which then planted the idea into my head of actually making this a thing. As such, I started working on a first track. Time will tell whether there will be more or not… 😉

When I Drink and The Queen’s Conservatory were tribute tracks to Assassin’s Creed Odyssey and the Night Far Covenant in World of Warcraft Shadowlands respectively, as I enjoyed their melodies so much that I had to make a tribute cover.

That’s it for my update today. I hope you like the redesign and new functionality!

February 27, 2021

Making music has always been a free time passion of mine. I do it because I love this feeling of creating something I have fun with. This is kind of true for everything I do, be it music, programming, or anything else. On top, I hope that maybe someone else enjoys it too, but that is never the driving factor for me. It’s a hobby and, despite some investments into it, I want to treat it as such and not imply any professionalism or feel compelled to meet any professional standards.

What matters to me is accessibility. That’s why I’ve always uploaded stuff to my YouTube channel. If you happen to like what I do, I want you to enjoy it freely. When it comes to my music, I dislike sitting on things for arbitrary reasons like compiling enough tracks for an album, then possibly worrying that my songs are too stylistically random to even fit together. When I finish a track, I usually just want to share it, and this is what I want to double down on more again. I’ve updated the Music page of my website to not just have free download links to my compiled albums but also to most of the (currently) standalone tracks I’ve created in the past few years. You want to listen to them offline on your favorite device or player - go right ahead!

For a while, I was considering to put a formal Creative Commons Attribution license on my music. I feel like if you enjoy it and want to use it for anything, you should be able to do so, as long as my name is credited. There should be no bar stopping you from worries about copyright and, hey, if you wanna remix me or so, why should I want to stop you? That’s pretty cool. I decided against formally declaring it creative commons content, for now. The license can come across as a bit specific regarding attribution and credit. Instead, I’m going with a more “common sense” approach, if that wording makes sense. I’m fine with people using my music as long as they reasonably credit me. It never hurts to have a simple communication, in any case. Just shoot me a note if you want to get a formal OK from me. Besides, I’m interested what people would like to use my music for. Maybe there are some cool project out here I wanna check out too!

If you want to listen to my music on a livestream, e.g. on Twitch, that is totally fine as well. There’s enough DMCA drama already - I’m honored if you want to use my music as a royalty free alternative. Otherwise, if you really want to support me with this hobby, you can just do so with a donation.

With all of this said, in case you haven’t already seen them already, I also want to share some of my latest songs here.

Links

Support Me